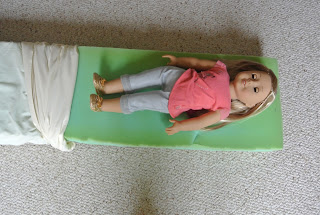
Hello, everyone! I'm back from my brief hiatus with a crafty tutorial for you: making an 18 inch doll bed. Really, you could use this tutorial with just about any kind of doll or toy, I just happened to be using Isabelle.
For this project, you will need:
- a doll or other toy
- a foam block
- a ruler
- a permanent marker
- an adult's help
- a knife
- a cutting board
- a pillow case (or other large fabric)
- sewing scissors/ fabric shears
- fabric
- hot glue and a hot glue gun
- any desired trim or decorations (ie the decal from a t-shirt)
- fiberfill
- a sewing machine (optional)
- needle and thread
- embroidery floss (optional)
Start by measuring your foam block against your doll. When you figure out how long you want it to be, place a ruler along the bottom. Remove your doll and make a line along the ruler's edge with Sharpie.
With an adult's help, place a cutting board under your block and cut through the foam along the line you made. Please, please don't do this unless you have (at the very least) adult supervision. Foam is somewhat hard to cut through, especially thick foam, and nobody wants to rush to the ER because they cut themselves while making a doll bed.
Once the foam has been cut, measure it against your doll again to make sure it is the right size.
Put the foam inside the pillow case. Make sure it is as far back in the pillow case as possible.
Cut off the open end of the pillow case. Make sure to leave enough fabric so that the whole foam block can be covered and save the end... you'll need it later.
Fold over the open edge of the pillow case like you are wrapping a present. Hot glue it in place. Do the same at the corners.
Using the leftover fabric from the pillow case, make a pillow. I ended up making two: one large one and one smaller throw pillow, shown above. To make the pillow, cut two rectangles. Pin them together with the wrong side up. If you want to have a lacy edge, pin the lace along the edges so that the decorative side is on the inside with the right sides of your fabric.Sew along three sides (hand or machine) and turn right side out. Stuff. Hand sew the remaining edge. If you don't want the lace, you can also cut one larger rectangle, then fold it in half.
Take larger fabric (in my case, fleece) and measure a large blanket for your doll. Cut it out.
Make sure it fits well over your mattress, then hem the edges.
A great way to add a decoration to your bedspread is to upcycle an old t-shirt. My Isabelle loves unicorns, so I thought this shirt was perfect.
Cut the decal off of the shirt, making sure it fits in your desired area. I wanted mine to be larger, so I made sure it filled the whole space.
Then take your embroidery floss and sew the edges of your design. You could also do this by machine so your stitches can't be seen or can have a fancy design.
Your bed and blanket are done! Put them in your doll's room and cover them with stuffed animals.
I hope you enjoyed this tutorial! :D


Comments
Post a Comment