Now, almost a year after I started, I am proud to present the last installment of my FF Anna cosplay tutorial!
You can see my previous installments here.
All screenshots from this tutorial are from disneyscreencaps.com, as usual.
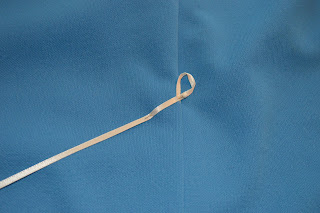
If you look at the design on Anna's skirt, she has this fancy swirl scrolling over the flowers.
I decided to recreate this using a thin cream ribbon I had.
This was simple, I just had to curve the ribbon into the same shape as the animated version and pin it at the loops.
Then I used my sewing machine and sewed it down where I had pinned it.
Done! Easy enough, right?
Anna also has two little bees on her skirt on the right side as you face her.
I painted the bees on using acrylic paint. Two ovals above one of the loops...
with antennae and wings...
and yellow stripes 'round the middle.
Anna's skirt has all these enormous, fancy, bejeweled sunflowers along the hem. There was no way that I was going to hand paint or embroider all of those designs; it would take WAY too long for one thing AND I had a better idea.
That's right: actual giant fake sunflowers from Michaels.
I simply popped the head of the flower off of the long plastic stems.
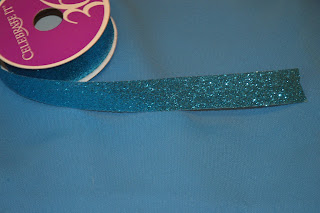
Then I positioned the flower where I wanted it to go and took my sparkly blue ribbon (also from Michaels) to make a stem. DO NOT GLUE THE FLOWER AT THIS STEP.
I cut the ribbon to the desired length...
... and sewed it down.
Once it was secure, I hot glued the flower on top of the stem.
Again, this isn't too hard at all!
Here's the skirt as a whole at this step:
Anna also has smaller flowers between the large ones.
They look like tulips, but I decided to use smaller sunflowers instead, since that's what I had on hand already.
These sunflowers had larger stems, so I had to cut off the bits of stem on each small flower I used.
I put a drop of hot glue on the place where the stem had been and glued each small flower in between two of the larger ones.
I really like how that ended up looking.
Here's the whole skirt again:
I wanted to add a little more sparkle to my skirt, since the skirt in the short film actually shimmers.
For practical reasons, there was no way I could paint the skirt with glitter and make the whole thing shimmer. I could, however, add some glittery details.
Once again, I turned to sparkly nail polish to achieve this effect.
One small dot went in each ribbon "valley."
One small dot went on top of each ribbon "peak."
The whole design:
Then I added one larger dot above the smaller flower and a stem under each.
Large dot:
Leaves:
I decided against adding the pockets for the sake of time and the fact that my skirt was already very detailed, but here's a photo of the design in case you want to add them to yours:
With that, we have now completed our Frozen Fever Anna skirt!!
What do you think?
Here's the final full costume:
I hope this was helpful to you! Have a magical day!


Wow, your skirt turned out amazing! Awesome job!:D
ReplyDelete-Emma-
Thank you so much!
DeleteIt turned out really lovely!
ReplyDeleteI'm glad you like it!
DeleteAHHHH
ReplyDeleteI have actually only cosplayed once, one Halloween. I was Alice Through The Looking-Glass! But not since then.
I bet that was a lot of fun! I've wanted to cosplay Alice since I started cosplaying. Haven't gotten around to her yet, though.
DeleteThat's so creative! And it came out super-cute, too!
ReplyDeleteThank you so much! I'm glad you like it.
Delete